
Each spring folks search for a mechanic to service their riding lawn mowers, in preparation for the mowing season. Most mowers can last for several years with some simple yearly lawn mower maintenance. Experience with servicing mowing equipment is a bonus, but the typical owner can do the job, with the right tools of course.
First, with an owner’s manual in hand, become familiar with the layout of your mower. Be ready to order the recommended filters and purchase oil and tools needed. Read on to learn about essential lawn mower maintenance: charging the battery and changing filters; checking spark plugs and sharpening blades; leveling the deck; checking pulleys and belts.
We used a Cub Cadet lawn mower in our video, but all mowers follow the same process.
CHECK OUT OUR YOUTUBE VIDEO FIRST
Battery and Filters: Top Needs for Lawn Mower Maintenance
Charging the Battery
The mower has likely been sitting idle all winter, leaving the battery to slowly drain. It is best to NOT let the battery go flat. Use a Batteryminder or Battery Tender to keep the battery charged during winter, extending its life.
TIP: If the battery is good and you can start the mower, let it run for five minutes to warm up the oil and loosen unwanted debris in the engine. This will make the oil change more productive. Then turn the mower off and resume charging the battery.
To fully recharge a weak battery, use a battery charger on the 2amp setting. Don’t set it higher than 2 amps to prevent boiling-out the battery. Assuming that the battery is at least partially charged, it will be ready by the time you finish all the other work.
Changing the Oil and the Oil Filter

Follow your owner’s manual to locate the drain plug and oil filter.
Place a catch pan under the mower and remove the drain plug. Oil will flow into the catch pan. Lift the dip stick up to allow air into the system and drain the oil out faster. While the engine oil is draining, remove the used oil filter. Remove the plastic cap on the new filter and rub some oil on the ring before twisting it into place. Hand-tighten the filter only, till it is snug.
With a permanent marker, write the date on the new filter, as well as the mower hours. This will help keep track of filter changes.
Most homeowners can change their oil and filter every two years, or every 50-100 hours of mower use. For commercial use, it is best to refer to the hours of operation.
TIP: Allow the oil to drip out for a while. In the meantime, you can skip ahead to changing the fuel filter and air filter. Then finish the oil change by adding new oil.
Once the oil has finished draining, replace the oil plug. With a clean funnel, add the manufacturer’s recommended oil (our Cub Cadet used 2- quarts of 10W-30 conventional oil).
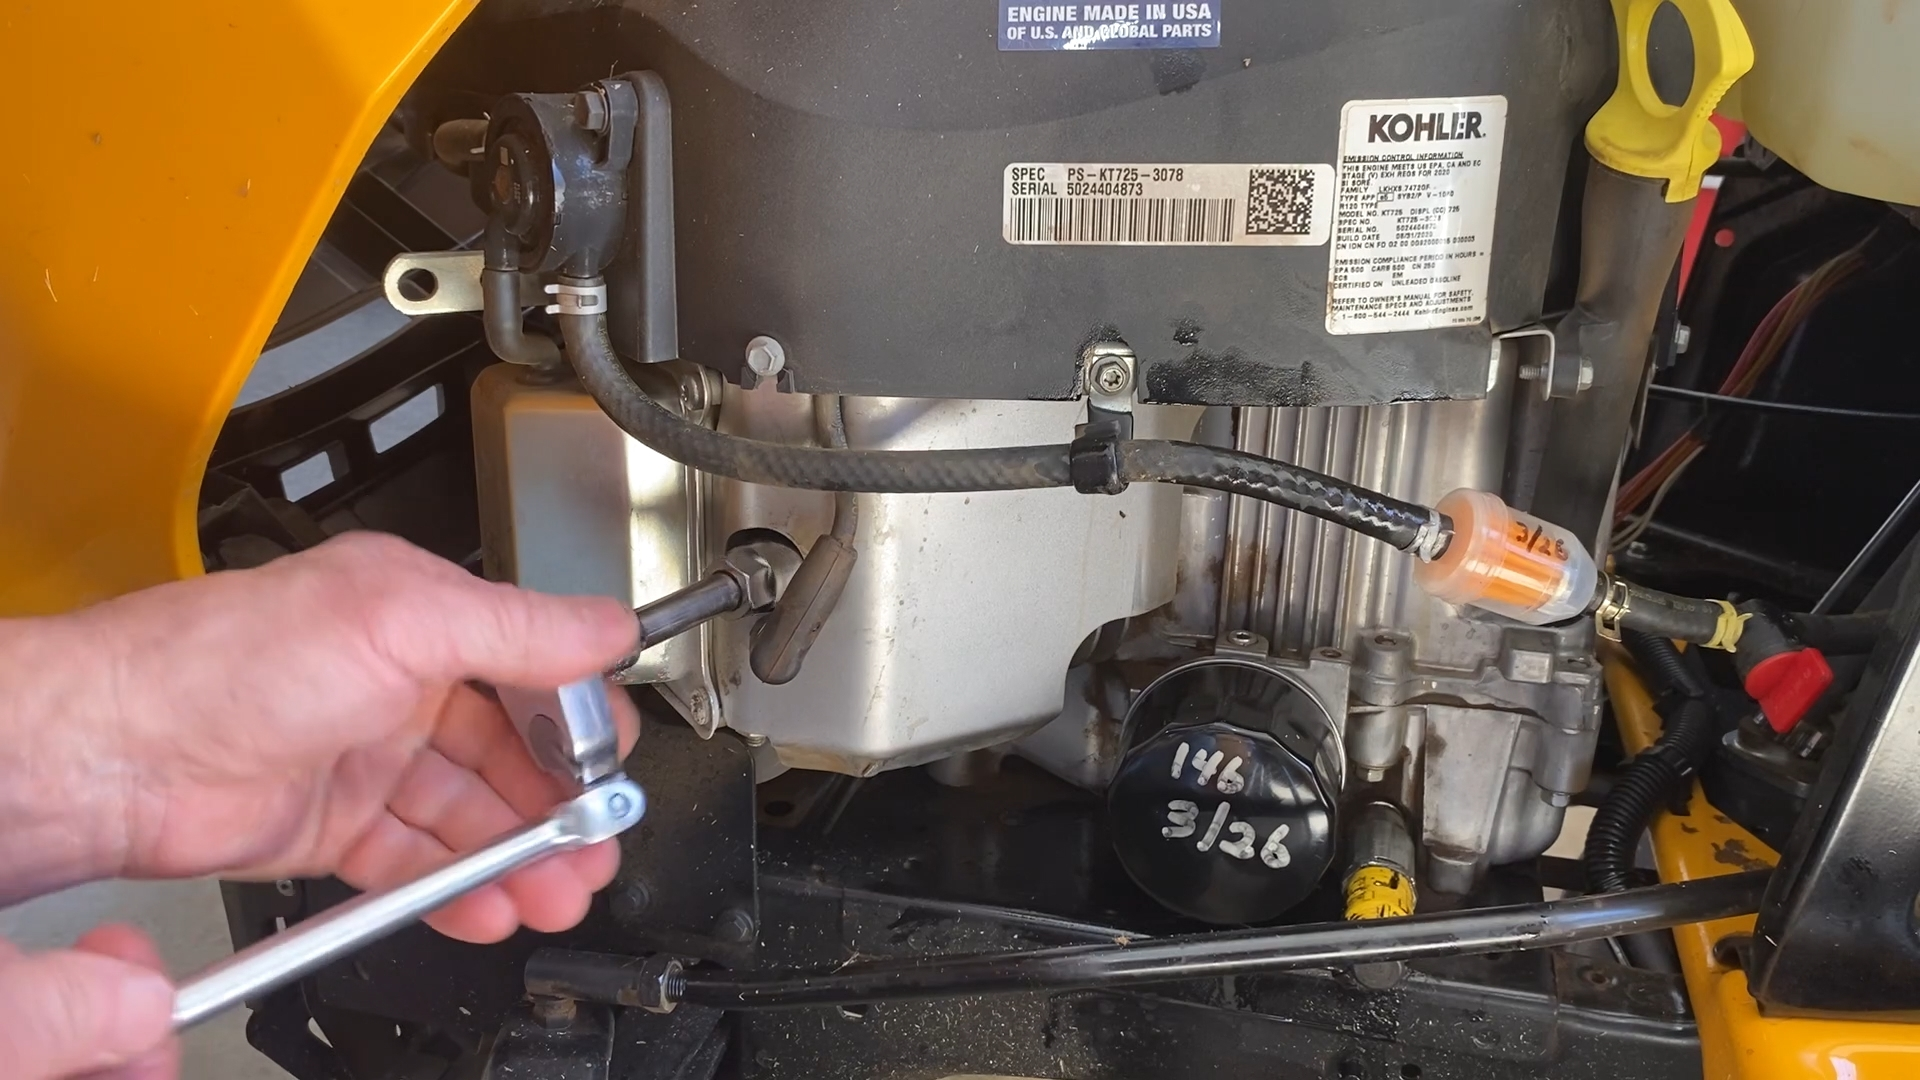
Changing the Fuel Filter
Like the engine oil, change the fuel filter every 50-100 hours.
Locate the fuel filter and the fuel shut-off valve. Close the valve to prevent fuel spills, or vice grips on the fuel line also works.
Notice the direction that the old fuel filter is installed. From the gas tank, the gasoline enters the filter’s collection area first. Then the gasoline will work its way around the paper strainer before entering the engine.
Remove the clamps and install the new filter in the proper direction. Replace the clamps and open the valve.
Changing the Air Filter
While the air filter can be cleaned, replace it after 100 hours. Write the install date on new air filters along with the mower hours. To check the old air filter, start by removing and inspecting it.
THE PRE-FILTER: Separate the pre-filter and paper filter. Wash the foam pre-filter with hot water and liquid dish detergent. Since the filter is covered with oil and dirt, don’t use the kitchen sink. After washing, give it a good rinse and shake it dry, then squeeze with paper towels to remove water.
Once the pre-filter is dry, pour a thin strip of 10W-30 motor oil around the exterior of the pre-filter. Wearing rubber gloves, work the motor oil through the filter by scrunching it in your hands till it is coated inside and out. The oil will serve as a dirt trap for dust and debris. New filters will also need oil worked into the foam pre-filter before use.
THE PAPER FILTER: Examine the paper filter. You should be able to see sunlight through it and it should be white in color. Tap the filter on a table to knock small dirt particles out of the fins. Replace yellow, dirty paper filters.
Spark Plugs and Blade Sharpening: Timely Lawn Mower Maintenance Service
Check spark plugs yearly and plan to replace them after 100 hours. Sharpened blades yearly, or every 50 hours.
Spark Plugs: Keep Engines Happy with this Lawn Mower Maintenance Step
Some mowers only have 1- spark plug. Check your owner’s manual for recommendations.
Our Cub Cadet has two Champion RC12YC plugs. Remove the spark plugs with an appropriate spark plug socket (5/8” socket) using a ratchet.
Examine the Spark Plug Tip:
| White to Off-White Color | Good to Re-Use |
| Tea Color | Good to Re-Use |
| Shiny Black | Foul Plug: Replace |
| Dull Black | Carbon Build-Up: Replace and troubleshoot carburetor and/or choke |
Check the gap on the new plugs using a spark plug gap tool and adjust as needed. Our mower’s recommended gap is .030”.

After setting the gap, use an anti-seize compound or PB Blaster on the threads for easier removal next time. Also apply silicone spray on the rubber inset of the socket.
Thread the spark plugs back into place using the socket and ratchet. 25 lbs. of torque is recommended. Seat the washer, then give it another 1/6 turn to tighten it just right.
Sharpen Blades
Lift the Mower and Remove Blades
Safety first is a priority. Use a floor jack and appropriately positioned jack stands or a lawn mower lift.
We use a Pro Lift Lawn Mower Lift to make things easy and safe.

With the mower lifted into position, locate the nut that attaches the blades. On our mower, a 15/16” 6-point socket is used on the nut. We also use a ½” air impact wrench to loosen the nut. Alternately, use a breaker bar or a battery powered impact wrench.
Remove the blades. At this time, scrape the underside of the mower using a blade to remove most of the debris. Pressure washed the underside later.
Examine the blades, looking for nicks, breaks or bends. Expect dull blades with no edge left. Also, inspect the back wings of each blade to see if they are still sufficient in size. Over time, the wings will wear down to the point that the blade should be replaced.
Sharpen the Cutting Edges
There are two cutting edges on each blade. To sharpen the blade edges, either use a Mill Bastard file only or a combination of grinding wheel and file work.
The goal is to file a smooth, even 30-degree angle onto the cutting edges of the blade. Cut one side of the blade only, at the 30-degree angle, leaving the other side flat. You can make a template out of cardboard to get the angle just right.

If using a grinder, the work will go faster. With a grinder, make several passes along the blade’s cutting side to remove nicks and to start re-shaping the 30-degree angle. A grinder will cut an arced groove into the blade, so adjust the angle of the blade with each pass to approximate a 30-degree angle.
Use the Mill Bastard file to smooth out the rough cuts left by the grinder. Most of the work will be done by the grinder, while the file touches up the cutting edge to a smooth, even plane. We used a 6” bench grinder with a medium cut wheel.

Reinstall the Blades
After the blades are sharpened, re-install the blades with the wings and cutting edges facing up. The flat, unworked side faces to the ground.
Place the impact wrench setting on 1, the lowest setting. Position the star fitting, which goes on flat. Tighten the blades. Lower the mower back onto the ground.
Leveling the Deck, Checking Pulleys and Belts, and Final Touches
Leveling the Deck: Cut Grass Evenly with This Lawn Mower Maintenance Fix
To level the mowing deck, park the mower on a very flat paved surface. Make sure to adjust the air pressure on all tires per recommendations. Once the tire pressure is perfect, it’s time to adjust the deck.
While a riding mower’s deck is level from left to right, the deck is pitched forward ¼”. To make these fine adjustments, check the owner’s manual to see where your left to right, and forward to back adjustment bolts are located.
First is the left to right adjustment. Begin by spinning the right side blade so that it is positioned left to right. Measure from the bottom of the blade to the ground and note the distance. Go to the other side and measure again. Lastly, use the bolt adjustment to get both left and right measurements the same.
Second is the front to back adjustment. Spin your right side blade so that it is positioned front to back. Measure the distance from the bottom of the blade to the ground at each end. To make adjustments, make sure the front measurement is ¼” shorter than the back measurement. This will pitch the deck forward perfectly.
TIP: On a mower with a single front mounting rod, turning the adjustment bolt clockwise will raise the front. Turning counterclockwise will lower the front.
Enjoying This Article? Mash That Button Over There and Never Miss an Exciting New Post!
Checking Pulleys and Belts, and Final Touches
Each mower is a little different and uses a special belt(s). There are typically 5-6 pulleys on top of the mowing deck.
Grasp each pulley and try to wiggle it. Replace pulleys if they are excessively loose. A loose pulley will destroy a belt, which is expensive to replace.
Check the belt for fraying and cracking. Sometimes a worn belt is a symptom of a pulley problem, other times it is from age or rough use.
The “V” edge of the belt should rest on the chamfered sides of the pulley, not riding in the bottom. Replace the belt as needed.
Grease and Wash: The Final Steps for Lawn Mower Maintenance
Lubricate the zerk fittings located on your mower. Purchase a grease gun and grease cartridge for your machine. Our Cub Cadet has 4- zerk fittings total; one for each front wheel and each front axle. Some lawn mowers also have a zerk fitting at the blades. Usually a couple squirts of grease at each fitting will do.
Lastly, wash the mower thoroughly topside and underside. A pressure washer makes this job easier.


Leave a Reply