
We’ve all fallen for those dreamy garden photos online — the ones with perfect pea gravel walkways winding through lush greenery. They make you think, “I want that in my yard!” Even more, the internet promises it’s all DIY‑friendly and simple.
But before you grab a shovel, let’s slow down. Some projects really are simple, others… not so much. This guide will give practical step-by-step instructions and alert you to common mistakes.
Section 1: Planning and Preparation – The Beginning of Walkway Success
Good planning sets you up for a lasting DIY pea gravel walkway that won’t let you down. Skip this, and you’ll waste time and cash later. Firstly, make notes about your yard’s layout.
Site Notes and Design
Write down everything about the site: length and width for the new walkway, low spots and high spots, buried utilities, tree stumps, buried boulders. Also, make observations about water movement through the site, like run-off water from downspouts or drainage swales. Measure slopes and grade changes with a level and a stringline.
Sketch the design on paper (graph paper is handy for this) and transfer important notes onto your sketch. Depending on your site, decide where to include steps, where to bury drainpipes, where to retain uphill slopes and edges.
Here’s a handy table for pathways:
| Pathway width for one person | 30″-36″ |
| Pathway for two side-by-side | 48″-54″ |
| Maximum slope for pea gravel | 3% (you can barely notice this) |
| Maximum handicap ramp | 8% (not for pea gravel) |
| Step tread height and depth | 6″ rise x 12″ deep min. |
Example sketches:


A Word About Slopes
Calculate Materials on Paper –
Avoid Those Painful Mistakes
In other words, figure out how much stuff you need before you buy it. But first, know how to build it correctly.
Pea gravel on bare dirt? Big No! Here’s the way the pros do it:
- Woven geotextile fabric (driveway fabric) is used to keep base stones from mixing into the subsoil below. Don’t use thin weed barrier, it’s not strong enough. Cut fabric to fit and overlay seams by 6”.
- 3”–4″ depth of base gravel (often called ABC or crusher run) is your path’s backbone. It is tamped firm and keeps the pea gravel from smushing away.
- 1”-1.5” depth of decorative pea gravel (typically 3/8” size pebbles) completes the top layer. Deeper than this and you end up with a smushy walkway.
- Strong edging is placed to retain gravel (steel edging, bricks, field stones, or timber) for a no-smush-zone. Avoid flimsy plastic edging, which is too weak.
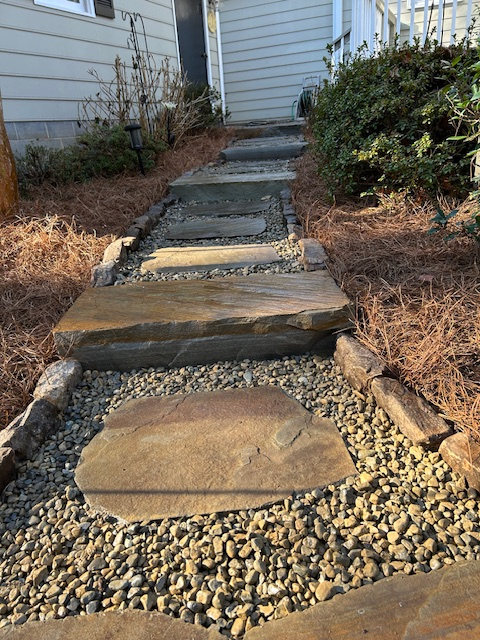
- As edging goes in, steps are added (timber, cut stone, or a concrete-step product) to maintain a gentle slope for the pea gravel pathway.
Basic Math – A Quick Refresher Course
- length x width = square feet
- square feet x depth* = cubic feet (see explanation below)
- cubic feet ÷ 27 = cubic yards
- 1 cubic yard = 1.5 tons
*depth = fraction of a foot. Is that clear? Let me explain…
1″ = .08 feet
2″ = .16 feet
3″ = .25 feet
4″ = .33 feet and so on
Sorry for that boring stuff. Here is an example that should have more meaning for ya’.
Example Calculations for a 3’ wide x 30’ long walkway:
3′ wide × 30′ length = 90 square feet (you will need at least 90 sq. ft. of geotextile fabric)
90 square feet × 4″ depth (.33 ft) = 29.7 cubic feet (you will need about 30 cu. ft. of base gravel)
90 square feet x 1.5” depth (.125 ft) = 11.25 cubic feet (you will need about 11 cu. ft. of pea gravel)
30’ path length x 2 sides = 60 linear feet (you will need 60 ft. of edging)
If the supplier sells in cubic yards or tons:
29.7 cubic feet ÷ 27 = 1.1 cubic yard ≈ 1.65 tons (about two pickup loads).
Simple Build or Difficult Build – Which One Do You Have?
Now that you have a handle on your project, take a step back and analyze it a bit.
Simple Build
Most DIY pea gravel walkway projects that I see on the internet are what I consider easy to build projects. Here, the walkway is short, the ground is nearly flat, the subsoil is firm and stable, and the ground is soft and easy digging. Also, there are no obstacles like tree roots or buried utilities. The site has easy access for equipment, and all excavated soil can be conveniently placed on-site. All existing lawns and landscape will remain intact and undamaged. Finally, there is a convenient parking pad available to stage materials.
Difficult Build
As professional landscapers, these are the projects we typically work on. Difficult builds have many challenges. As the difficulty increases, the project becomes less DIY friendly. Decide how much you can do and when outside help is needed.
Here are some challenges to watch out for on a difficult build: a very long walkway, steep slopes, subsoil that is soggy and unstable. The site has difficult access for trucks or equipment. Washed-out areas, exposed or shallow utilities, buried tree stumps or large roots plague the path area. Existing walk removal is needed, and existing lawns and landscape will be damaged during construction. Finally, waste must be hauled to a landfill due to lack of space to stage materials.

This difficult build requires removal of the old path that completely washed-out from a combination of driveway runoff and clogged gutters. Also, there is a steep downslope. Utility lines are exposed and too shallow. Lastly, a tree is too close to the house, pinching the path and limiting options for soil stabilization.
Section 2: Purchasing Gravel and Essential Tools
Time to go shopping! Check out different suppliers to get the best prices. Note delivery costs or see if you can pick materials up yourself.
Essential Tools
Basic tools that make this work easy include a pointed shovel for digging, a wheelbarrow, a flat shovel for moving gravel piles, a sturdy metal rake for spreading gravel, a hand tamper to pack down layers, a hand cart to move large step stones or boulders if needed.
To really speeds things up, use equipment like a front-end loader, a plate tamper, and a dumping trailer to pick up and deliver gravel.
Material Purchases and Delivery
Bulk gravel is heavy, messy, and can damage a truck bed. So, borrow your neighbor’s truck, ha-ha, just kidding. If you’re purchasing from a quarry, check their load requirements (they might not load into a truck at all). Renting a dump trailer is a good choice. Delivery is better! Once the material arrives, have a staging area where loose gravel can be dumped. A tarp laid on the ground prior to dumping the pile will make clean-up easier. Pro Tip: We always buy in bulk, since it is much cheaper.
Bagged gravel is more expensive but often a better choice for those with a small DIY pea gravel walkway. Several bags of gravel can be palletized, and the pallet of gravel bags can be loaded onto a truck or trailer. Moving bagged gravel is often easier, too, especially with a sturdy wheelbarrow.
Multiple trips across a lawn area with either a tractor or wheelbarrow is very damaging. Consider laying plywood boards to reduce compaction. Alternately, some construction suppliers have ground protection mats for rent.


Construction Guide – Simple DIY Steps
1: Prep the Site
- Outline the path with stakes or spray paint.
- Excavate 4–6″ deep and smooth out bumps.
- Relocate or haul away excavated soil.
- If roots or stumps are present, remove them to prevent sinkholes as stumps rot.
- Bury drainage pipes to prevent washouts from downspouts, etc.
2: Build the Path
- Lay woven geotextile fabric first then tamp. Sturdy fabric will hold up to tamping.
- Start positioning your edging.
- Begin adding 3”–4″ of base gravel while backfilling the outside of the edging to keep it tight.
- Rake gravel smooth and sprinkle lightly with water. Then tamp the gravel firm. Also, tamp the edging backfill.
- Add steps as needed in key locations.
- Rake out uneven spots and tamp again (make sure the tamp is free from mud to keep your gravel clean). The path should now be firm and as smooth as your finished walkway will be.
- Finally, add 1”-1.5” of decorative pea gravel and smooth-out with the backside of a rake, till it’s nice and level.
3: Clean Up Site
Smooth disturbed soil behind the edging then re-mulch to cover bare dirt. Touch-up lawn areas disturbed by all the work and tidy the site overall.
When you’re all done, return pallets and rentals.
ENJOYING THIS POST SO FAR? MASH THAT SUBSCRIBE BUTTON.
Section 3: Maintenance for an Enduring Walkway
A little upkeep goes far. Your DIY pea gravel walkway stays fresh with easy maintenance habits. Don’t let neglect turn it shabby.
Effective Weed Control Strategies
No matter that you used geotextile fabric and all that gravel, weeds grow from seeds that blow right-in on top of your nice work. Hand-pull small weeds that appear in your pea gravel, or spot treat them with herbicides.
In fall, remove leaves before they break-down into your path. Organic debris wedged between your pea gravel will just breed weeds.
Prevent adjoining plant bed mulch from washing into your walkway. On that same note, prevent lawn mower clippings from blowing into your walkway. Again, that organic debris makes a happy home for weeds.
Managing Displacement and Topping Up Material
Gravel moves with weather, but that is one of the great things about a pea gravel path. It’s very forgiving. Freezing and thawing of the subsoil will move the walkway slightly but only cause minor settling. However, heavy rain can displace pea gravel. If that happens, simply rake it back into position. Over time, if thin spots show, add a little layer of matching pea gravel.
There You Have It: Your Step-by-Step Guide for a Professional Pea Gravel Walkway
Build your DIY pea gravel walkway right, and it’ll charm your yard for years. Avoid these top pitfalls: poor planning, no geotextile fabric or stone base, weak edging, and steep slopes. They cause most failures.
Follow this guide, and you’ll have a path that’s lasting and pretty.


Leave a Reply